In this post I'm going to detail the steps I went through to create a Gradle plugin for Android from scratch.
I've been meaning to write this post for a while, ever since I did my first post Monkeying around with gradle to generate code and the recent Caster.IO post by Annyce Davis - Gradle Plugin Basics - inspired me to actually get it done.
I've found it very difficult to create a standalone gradle plugin for Android Studio. There's a lot of documentation around, but it always seems to be missing something. Have you ever tried doing a Google search for create a gradle plugin for android? I have and the results that I get are pretty lack-lusture.
Even Gradle's own documentation on the subject
only helps a little. The section on creating a standalone project pretty much
consists of telling you to add two lines to your build.gradle and adding a properties
file. It doesn't tell you how to build it. The publishing section assumes you
know about publishing and want to publish it to the public. What about if I just want to build it to run it myself
to see if the bloody thing works?
And what about if you want it to run as part of your Android Studio build process? A little help?
I'm not going to cover every possibility of everything you might want to do in this one little blog post, but hopefully it'll be a good starting point based on what I've learnt.
Anyway, enough chatter. Let's get to it.
Step 0 - Assumptions
I'm going to assume that you are already set up for Android development, that is you have Java installed, Android Studio and the appropriate build tools. I think it's a safe assumption; writing a Gradle plugin isn't the first thing you want to be doing as a brand-spanking new Android developer.
From your point you have to assume that I'm not an expert on Gradle. I really don't know that much about it. What I've written here is what I've found out and what works for me. You can also assume that I'm devilishly handsome and a great conversationalist if you wish. However those aren't necessary for the purposes of this blog post.
Step 1 - Getting set up
This is the one thing that I could find no decent information on at all; how to even get set up.
Install groovy and gradle. On my Mac I used Homebrew. You might be better off downloading directly.
Android Studio is a customised IntelliJ. As such it isn't suitable for writing standalone Gradle plugins. If you try to create a new project it will be an Android project. This is fair enough. That's what it's for. So the first tip is to download and install IntelliJ.
Go, grab the community edition from https://www.jetbrains.com/idea/
This post was written using version 15.0.3. If you're reading this in the future and I haven't updated it for the new version then you'll have to wing it and try to work out what I'm on about.
It's free, has what you'll need, and will be hauntingly familiar if you've been using Android Studio. (Sorry for those still using Eclipse.)
Install it and when you run it for the first time just accept all the install defaults. If you really want to mess around with the plugins at least make sure you have groovy, gradle and maven integration installed.
When you're sitting, staring at the IntelliJ IDEA window, hit Create New Project and the fun begins. Hopefully you'll see a screen that looks a little like this:
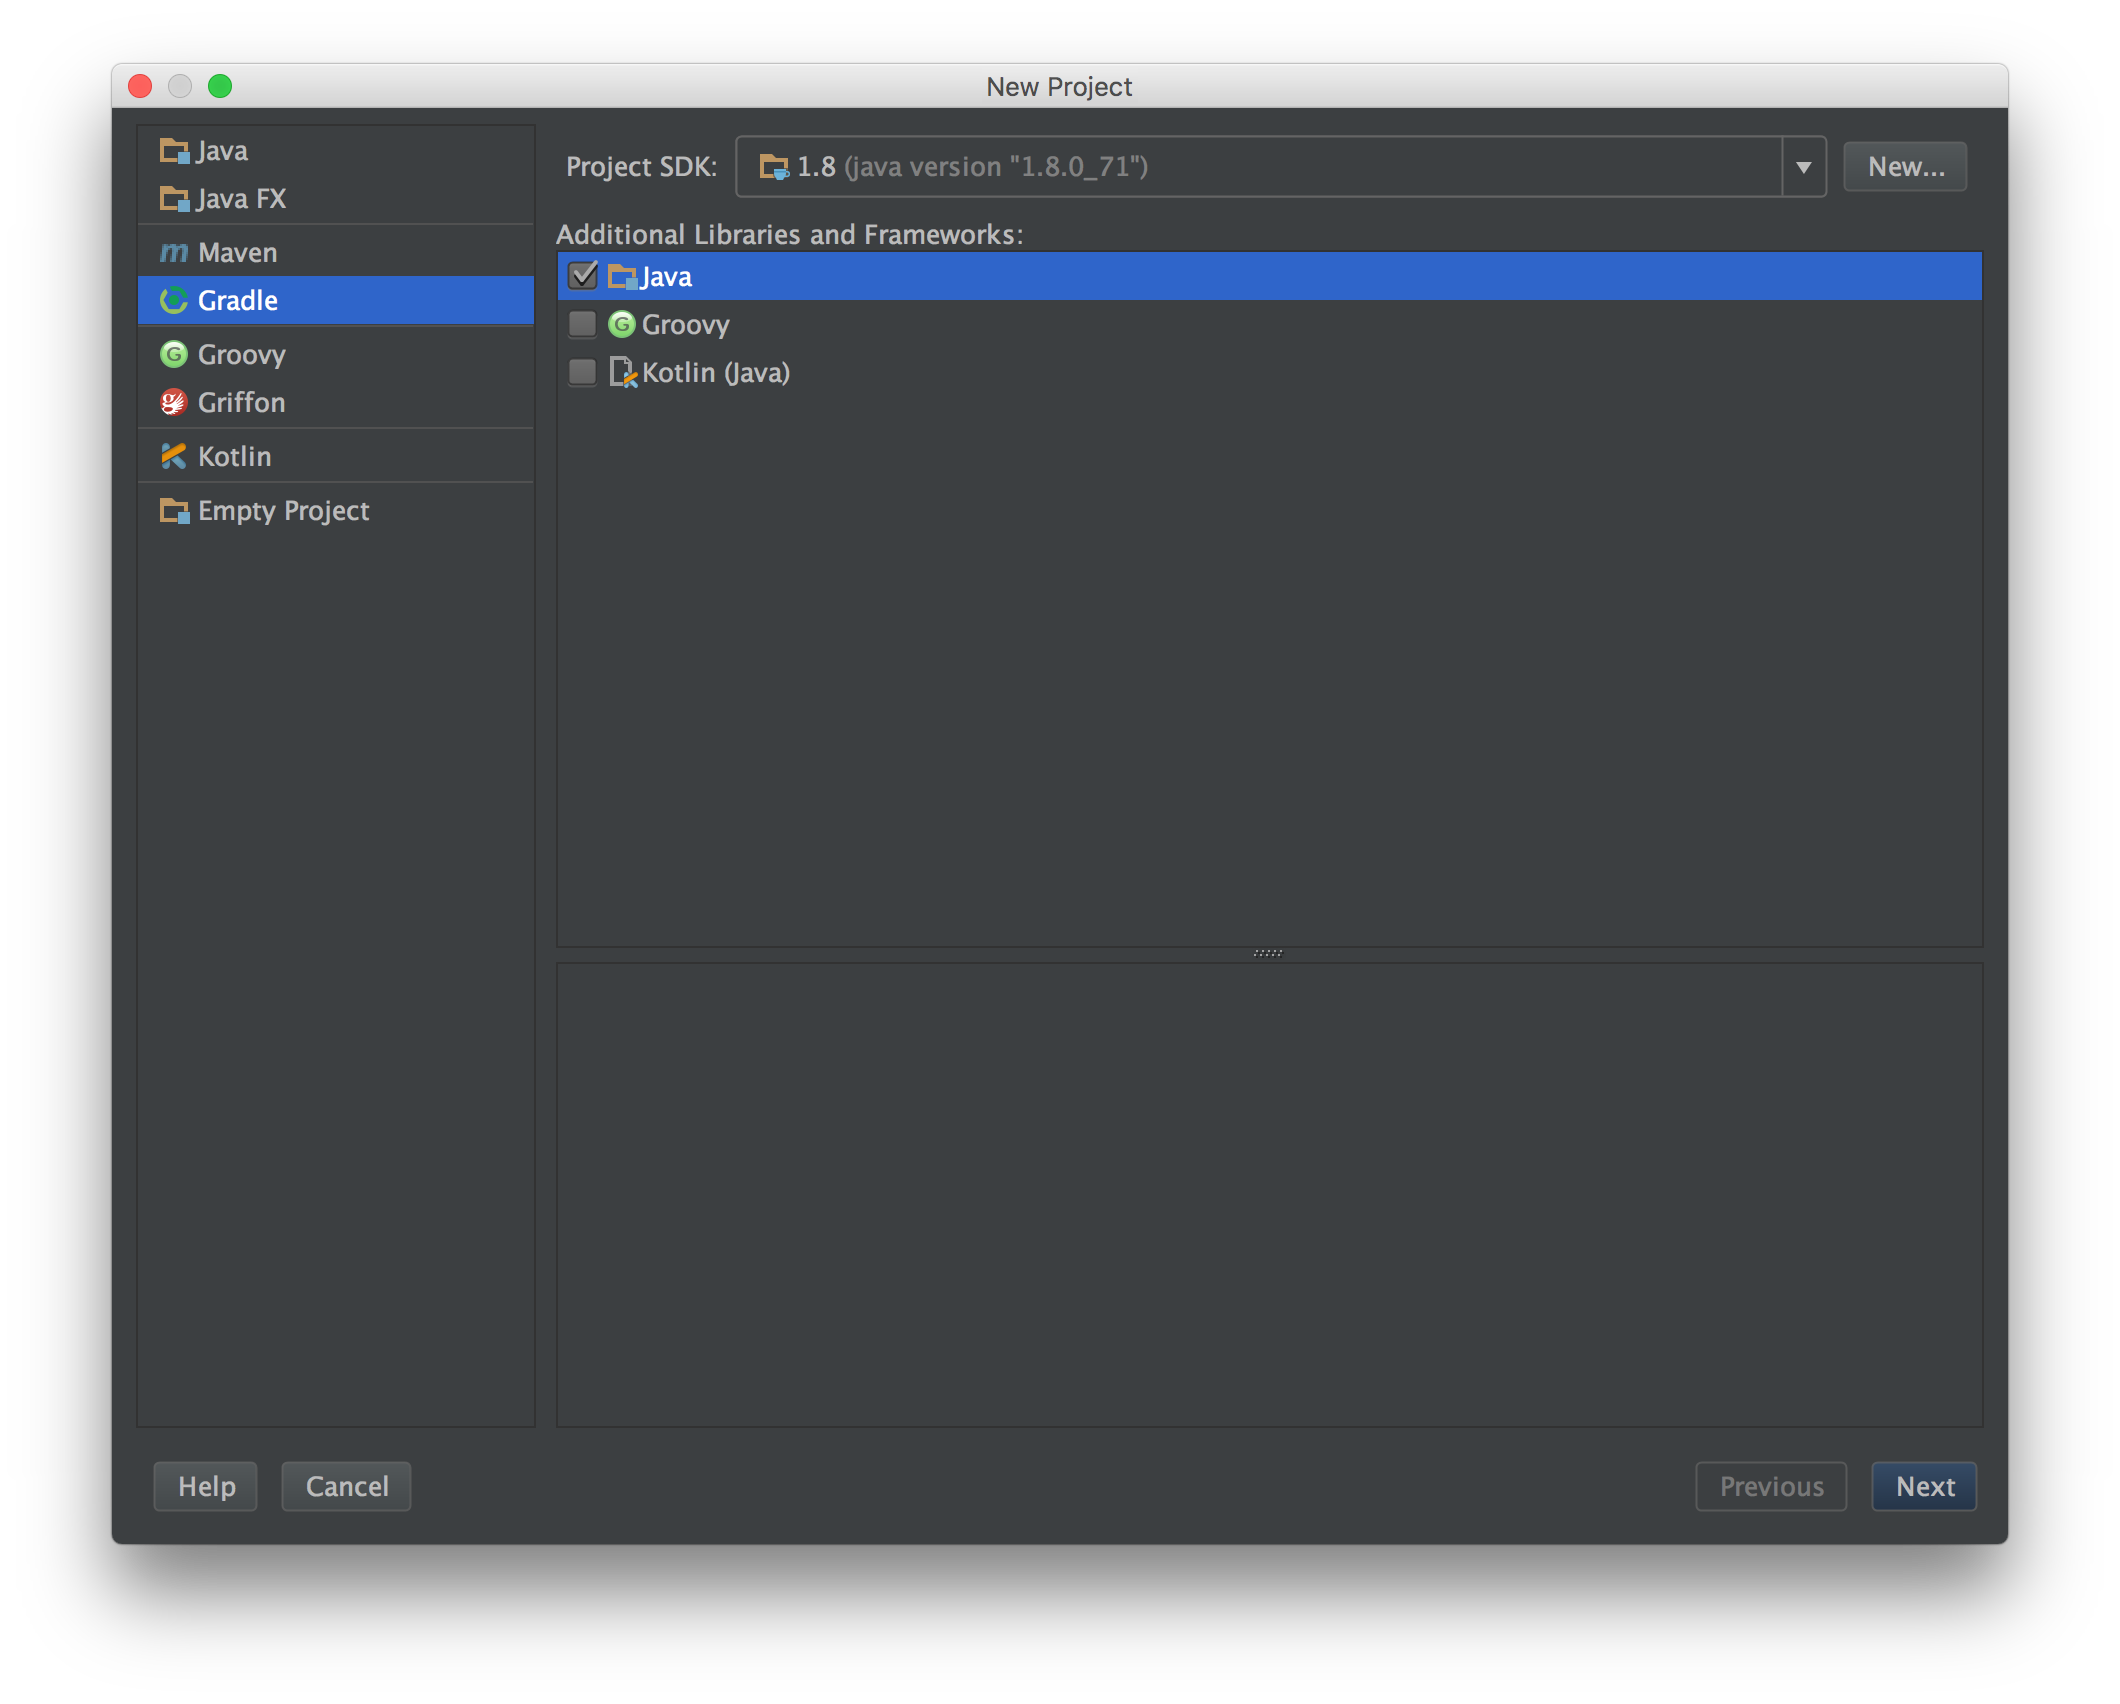
If Gradle is missing from the left or Groovy is missing from the right then it means one of the needed plugins is missing. In this case hit Cancel and from the main screen hit Configure -> Plugins to enable more plugins and try again.
If your Project SDK isn't showing a Java version, hit the New... button and locate your Java install directory.
Tick the Groovy option and then hit Next
On the next screen you need to fill in the GroupID and ArtifactId. Whilst these
can be anything, let's stick to convention. Make the GroupID
the same as the Company Domain you use for your Android apps and the ArtifactId
is the name for this plugin you are going to create. (For this blog post
I'm using com.afterecho and blogpost for GroupID and ArtifactId respectively.)
Leave the Version alone
for now at 1.0-SNAPSHOT and hit Next
Don't change anything on the next screen. It recommends "Use default gradle wrapper" and who are we to argue? Hit Next.
You probably don't want to change anything on the next screen unless you want to move your project to a different directory. When you're done, hit Finish.
Step 2 - The journey begins
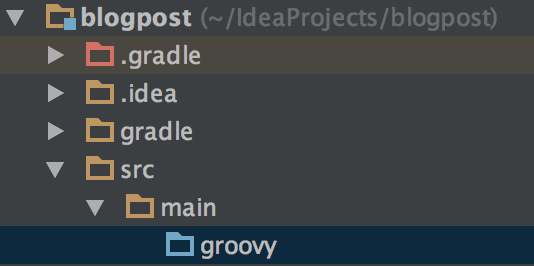
Once IntelliJ has created your project you'll notice a complete lack of any source code directories. At the top of the Project tree, right click, go to New and then Directory.

Enter the name src/main/groovy. If all is well
the groovy directory will have a different colour to indicate that it is a
source directory.
If you right-click on the groovy directory you'll see that, under New, you can now create packages and classes rather than just files and directories. Create an appropriate package and then a Groovy class in that package for your plugin.
Modify the class definition to add implements Plugin<Project> so it looks like
1 2 | |
and what you'll find is the Project class is unknown by IntelliJ. If you try
to use IntelliJ to auto-import it, it won't happen.
Step 3 - Building blocks
We're missing something. Why can't we import Project? The documentation from
Gradle says that we need to add
dependencies {
  compile gradleApi()
  compile localGroovy()
}
into our build.gradle. Great. Add those two lines to the dependencies
section that already exists in the build.gradle.
By the way, when you load the build.gradle for the first time IntelliJ will probably say "You can configure Gradle wrapper to use distribution with sources. It will provide IDE with Gradle API/DSL documentation." It's probably a good idea, so hit "Ok, apply suggestion." If you don't see this then it probably means your copy of IntellJ doesn't like you but don't worry about it; it won't affect what we're doing here.
Once the two dependencies have been added to your build.gradle hop back to
our plugin class and user the power of IntelliJ to import Project, right? Maybe.
If you added the dependencies in before hitting the "Ok, apply suggestion" then
you can. There are multiple options so make sure you choose the org.gradle.api
version.
If you did it in the other order then you will find that the org.gradle.api version
of the Project class is missing. On my install I only get org.apache.tools.ant.Project
which is wrong.
I'm used to Android Studio and when you add a dependency in the build.gradle
it tells you that you need to sync the project. IntellJ doesn't do this.
You have to do it yourself. And you'll have to do it every time you add a
new dependency to your build.gradle.
To do it, go to the View menu, then to Tool Windows and then to Gradle.
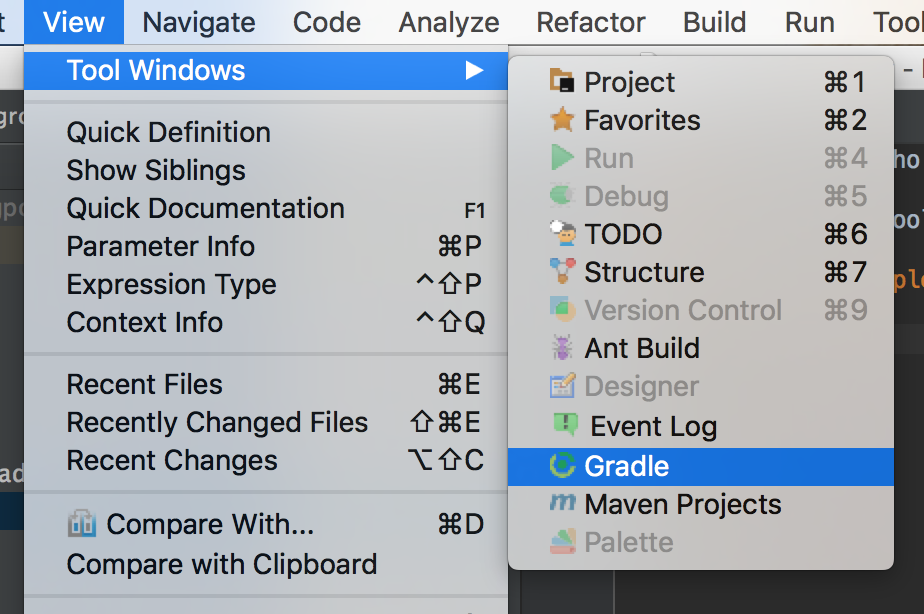
When the Gradle tool window pops out, hit the refresh button in the top left.
You would not believe how much time I wasted trying to work out why I couldn't import Project.
Once you've imported Project and Plugin you'll see the red squiggly line of doom under your class definition. Time to implement a method.
Step 4 - Apply yourself
The missing method is apply(). Use IntelliJ's intentions to add this in
automatically (CTRL + Return, ALT + Return depending on your O/S and keymap).
This is where the magic happens. If you were to put a println in apply()
you'd see in your Android build that this happens right at the start of the
build process, before anything else really happens. Not useful.
So what's it for? Here we can create a Gradle Task to do the work at an appropriate time.
(To make the rest of this easier to follow assume that the plugin class I'm creating is
called BlogPlugin in the package com.afterecho.gradle. Note that the
package name for your plugin doesn't have to be the same at the GroupID configured
when creating the project.)
This is where we create a Gradle
Task. In the simplest case we can create one task that is executed only when
we explicitly request it rather than as part of the normal build flow.
An example of this in the standard set of tasks
for Android is the uninstallAll task that uninstalls all builds and flavours
of builds of your app from all attached devices. uninstallAll doesn't run
as part of your normal build process. You have to manually run it.
Let's create a task called showDevices that simply executes adb devices.
Make the apply() method look like this:
1 2 3 4 5 6 7 8 9 | |
Simple. A new task is created with the name showDevices. This task
has an action that gets the path
to adb and runs a command. The project (target) has an android property
that we can use to get some useful information. In this case, the path to
the adb command.
The setting of the description is just to be
nice to people who run ./gradlew tasks or like to look at tooltips in Android
Studio so they can see what our
task does. The setting of the group is to make it easier to find in
Android Studio and the gradle tasks output.
Ultimately our class should look like this:
1 2 3 4 5 6 7 8 9 10 11 12 13 14 15 16 | |
How do we use the plugin now that we've written it? Another source of frustration. I tried many ways to create JAR files that could be dropped in places and I got nowhere. I didn't want to publish my nascent plugin to Maven Central or JCenter.
Step 5 - When life gives you repos...
You can create a maven-like repo on your local file system. Yay!
Create a directory somewhere on your machine. For this we need to modify
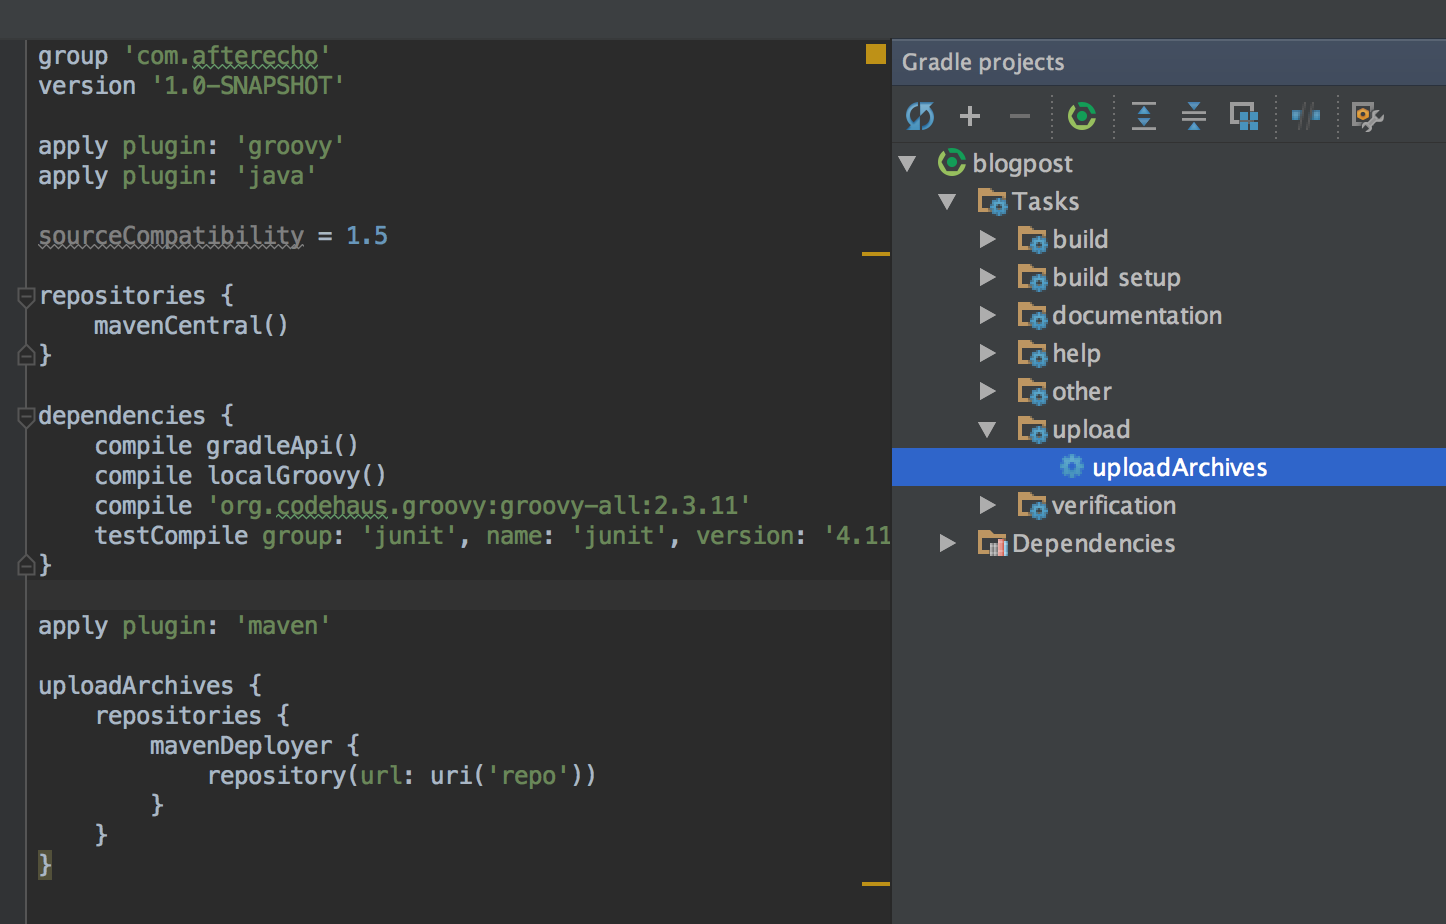
the build.gradle again to add the following to the end
apply plugin: 'maven'

uploadArchives {
    repositories {
        mavenDeployer {
            repository(url: uri('repo'))
        }
    }
}
Replace 'repo' with the full path to your directory. If you just put 'repo' like I have then it will go into a 'repo' directory within your plugin's directory, which has the advantage that you can see it in Intellij.
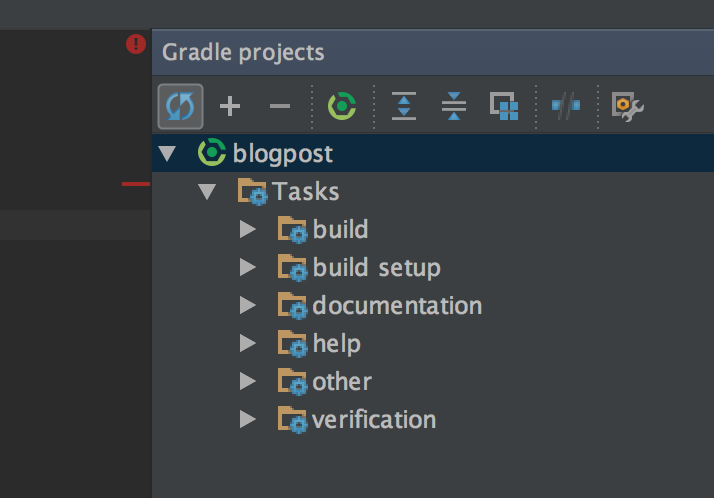
Don't forget to bring out the Gradle tool window and hit refresh! Leave the
tool window open and you should now see a new task; uploadArchives
Double-click on uploadArchives to run it. The first time you'll get a message
in the console window saying something about not being able to find metadata.
Don't worry. The metadata gets created and subsequent runs will not complain.
If you look in your repo directory you will find something like this
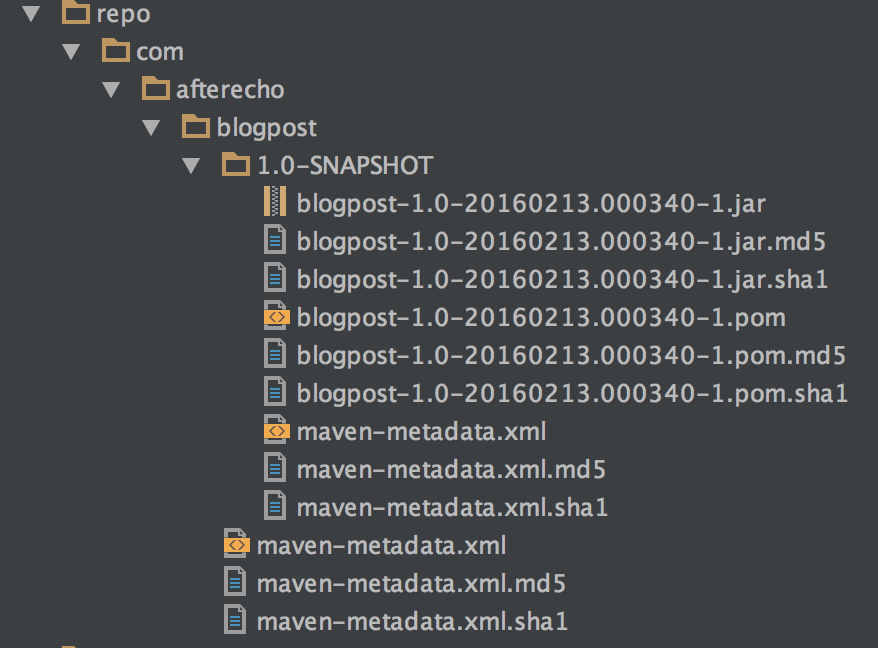
It's your very own maven repo. :)
You can see that all the files have a timestamp in them. This is because you
have specified this build is a snapshot (remember the version number right at
at the beginning?) Every time you run the uploadArchives task it will create
another set of files.
To stop ourselves from getting overloaded, change the version in your build.gradle
to remove the "-SNAPSHOT", delete all the files in your repo directory and run
uploadArchives again.
Our plugin still isn't quite ready to use. There's one missing file.
Step 6 - Searching for plugins (in all the wrong places)
We need one more file in our archive that tells Gradle which class our plugin is
in. Back in our project structure, right click on "main" and create a
directory resources/META-INF/gradle-plugins
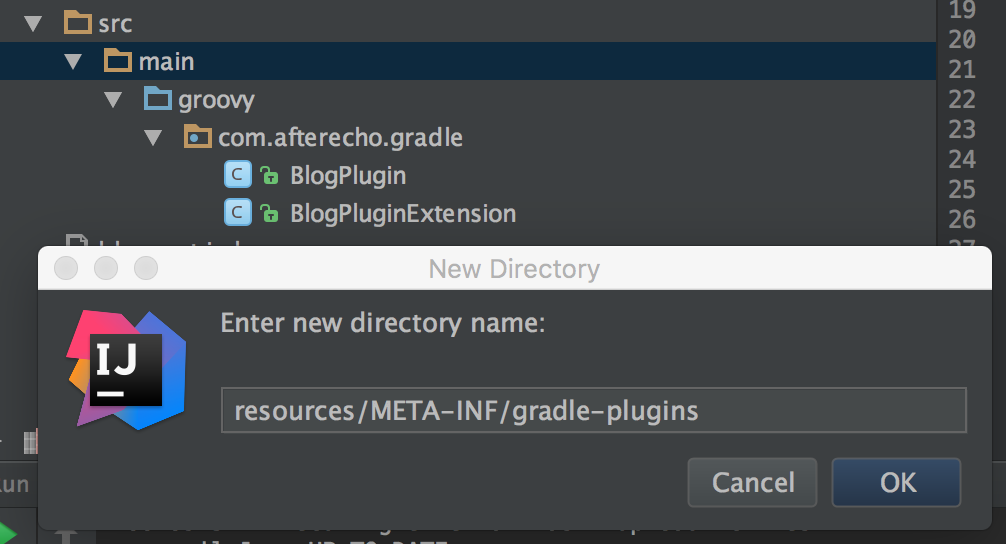
In this directory create a new File. The filename is the name you want to
give your plugin (the PluginId) followed by ".properties".
In the build.gradle for a standard Android app there's a
line
apply plugin: 'com.android.application'
so the file for this would be com.android.application.properties
I don't recommend you call your plugin com.android.application so let's call
the file com.afterecho.blogplugin.properties
In this file put a single line; implementation-class= and the fully qualified
name of the class that extends Plugin<Project>. In my case it is
implementation-class=com.afterecho.gradle.BlogPlugin
Step 7 - Publish and be damned
Run the uploadArchives task again. Now we can leave IntellJ alone for a while
and go to the totally different environment of Android Studio.
Create a new Android application or load one that you prepared earlier. Open
the Project level build.gradle and in the repositories section of the buildscript
section, add in
maven {
    url uri('/path/to/the/repo/directory/created/earlier')
}
(Change the path as appropriate for where you put your repo earlier.) Your project now has a new place to look for plugins.
In the dependencies section of buildscript add in
classpath 'com.afterecho.gradle:blogpost:1.0'
This declares the dependency of our Android build on our plugin. The name here relates back to when the plugin was created. The bit before the first colon is the GroupId, the bit between the colons is the ArtifactId
If you created a new project, it should look something like this:
buildscript {
    repositories {
        jcenter()
        maven {
            url uri('/tmp/repo')
        }
    }
    dependencies {
        classpath 'com.android.tools.build:gradle:1.5.0'
        classpath 'com.afterecho:blogpost:1.0'
        // NOTE: Do not place your application dependencies here; they belong
        // in the individual module build.gradle files
    }
}

allprojects {
    repositories {
        jcenter()
    }
}
Now open the Module level build.gradle and, after the apply plugin: com.android.application
add
apply plugin: 'com.afterecho.blogplugin'
This is where the PluginId comes in - remember the name of the properties file?
To clarify there is
- GroupId
- ArtifictId
- PluginId
The PluginId can be - but probably shouldn't be - totally unrelated to the GroupId and ArtifictId.
Android Studio should be asking you to Sync Now. Go for it. A bit of an anti-climax isn't it? Nothing seems to have happened.
Step 8 - The Grand Finale
The reason is we created the task but we haven't called it. You can run the task within Android Studio from the Gradle tool window.
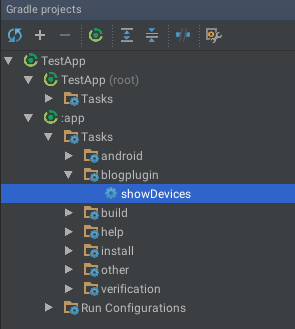
Look in the "blogplugin" section for showDevices. If you hover your mouse over it
you'll see the description we set earlier pop up in a tooltip. Double-click
on showDevices and behold the output in the run tool window.
You can also run it from the command line within the applications project directory. By running
./gradlew tasks
you should see in the "Blogplugin tasks" section our "showDevices" task, along with the description. Run it with
./gradlew showDevices
There we have our first Gradle plugin for Android. I know it's not much, but it's a start. In a future blog post I hope to expand the plugin to something that's a little more useful.
Darren @ Æ
Comments
comments powered by Disqus